Radishes are one of the first crops from the garden. They can be cultivated and grown early in the growing season, and again in the fall when the temperatures grow cool. One of the best choices for first time gardeners.
This article sets forth several tips and tricks to ensure a great crop of radishes, including:
- Differing radish varieties including those that can handle hotter temperatures
- When and how to plant radishes
- Watering
- Fertilization
- Harvesting
- Preservation and storage
- Benefits
- Recipes
Radishes are one of the funnest, and simplest plants to grow in the garden. In less than a month you can plant and harvest. These little root crops have been celebrated and eaten for centuries. Radishes have a long colorful history that points to origins in China. Today there are larger radish varieties that are a mainstay for major consumption in China.
You can find the little tasty root vegetable in almost every salad bar, taco stand, and buffet around. Radishes are used for texture, flavor, garnish, and decoration throughout the culinary world.
The humble little root crop has traveled the world and become a favorite for gardeners, especially young impatient gardeners. If you have a child who wants to have a positive experience with gardening, radishes will fit the bill. You can plant and harvest a healthy radish within 21 days. In the gardening world that is light speed.
There is a little more to growing radishes than to toss out some seeds and pick the harvest a day later, but not a whole lot more. Let’s dive into the world of radishes and see how to grow and enjoy them in your garden.
Varieties of radishes
There are three main groups of radishes: spring varieties, summer varieties, and fall/winter varieties.
Spring
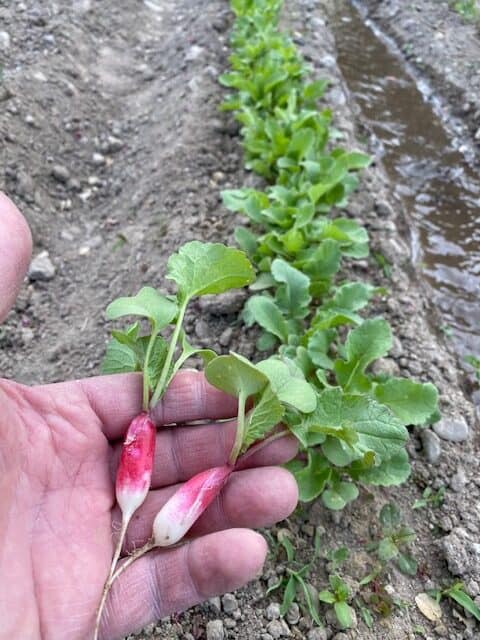
Spring radish varieties are generally small, short, and round. Spring varieties grow very quickly and need cooler temperature. You can store the spring varieties fresh for a few weeks, but long-term storage will require processing. It’s recommended to enjoy them when they mature and eat them fresh.
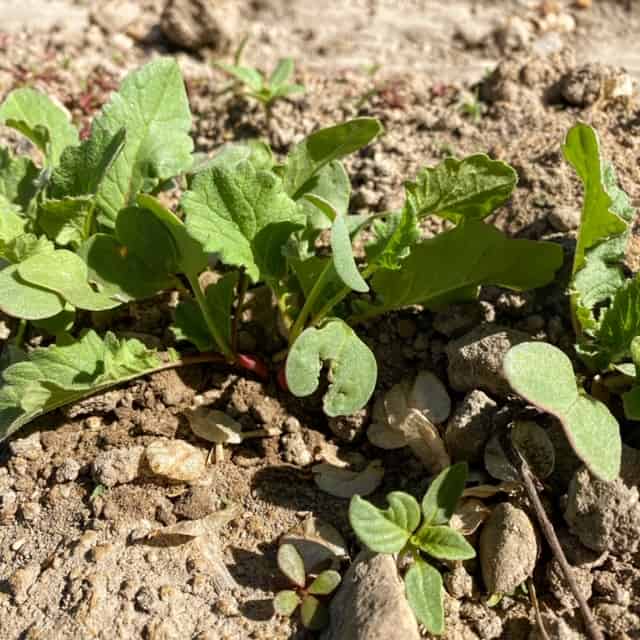
Spring radishes are some of the first fruits of the garden. It is exciting to see the spring radishes break through the soil and grow. Radishes are one of my favorite crops to have children grow. If you are a little impatient or your children are a little impatient, spring radishes are the plant for you. You can go from planting to eating in as little as 3 weeks.
Don’t let the radishes go too long before harvesting and eating. They can get fibrous and tough to eat. Some become pithy and really spicy hot. When it does get hotter temperatures the spring radishes have a tendency to bolt and seed. Often the seed pods can be eaten instead of the root when this happens.
The varieties of spring radishes we recommend are:
- Champion
- Cherry Bell
- Cherry Bomb
- Crimson Giant
- White Icicle
Summer
Summer varieties can be grown in the spring as well but can handle warmer temperatures. Summer varieties will take quite a bit longer to mature than the spring varieties. Summer radishes will generally take from 6-8 weeks to mature to harvest. There are some new varieties being developed to mature quicker and handle warmer temperatures better.
Summer radishes are a little more temperamental to grow. You will need to keep the soil damp and only weed lightly around them. Summer radishes have delicate roots and can be damaged easily. Often a good mulch on top will help to keep the soil moisture consistent as well as keeping the plant cool.
Some summer radish varieties we recommend are:
- Rover Hybrid
- Crimson Giant
- Dragon Hybrid
- Black Spanish Round
- Giant of Sicily
- Rat-tailed Radish (grown for the seed pods instead of the radish root)
Fall/Winter
Winter varieties of radishes are usually a longer root and will take longer to mature. Winter varieties can be grown in the spring and fall garden. Fall/winter radishes can even handle a little warmer temperature. Winter radish varieties can store throughout the winter in the ground or bedded in sand in a cool root cellar.
Winter radishes are a little different flavor than the fast spring radishes. The winter radishes take a little bit longer to mature and are a little different composition. Winter radishes can be grown in a spring garden just fine, but they do well in a fall garden and can store better than the fast-growing spring varieties.
Winter radishes are something fun to try when you want to explore different tastes and textures. Some countries, especially China, will use winter radishes as a staple crop. These winter varieties are sometime known as daikon radishes. They can grow much larger than the spring ones you may be used to. Some grow up to a pound.
Some winter radish varieties we would recommend are:
- China Rose
- Black Spanish
- Watermelon Red
- Miyashige Diakon
- Minowashe Diakon
- Formosa Giant Luo Buo
When do you plant radishes?
All radish varieties like full sun, 6-8+ hours a day. All radish varieties like consistently moist soil.
When you plant radishes depends on what kind of radish you are planting, spring, summer, or fall/winter radishes. You can plant all spring, summer, and winter varieties in the early spring if you want to. You will just need to allow time for the longer maturing radishes to grow.
Spring radishes will do best planted early in the spring as soon as you can get on the garden plot and work the soil. When growing spring radishes, you can plant them early in the spring when the temperatures are cool. Mild frost doesn’t hurt radishes, and they can even handle a light snow.
When you plant spring radish seeds, you should space them 1/2 inch apart. If you have sandy soil you will need to plant them 1/2 inch deep. If you have heavy clay soil you will need to plant them a little shallower, about 1/4 inch deep. The clay will keep more moisture in the soil and can sometimes create a harder crust for the radish sprout to break through.
Spring radishes are fast growing, so you don’t want to waste a lot of space in the garden. Often radishes can be sown into areas that will get filled in later by other plant foliage. Between carrot rows, or spaces between cucumbers etc.
Many gardeners will plant a few radish seeds along with other root crops like carrots, beets, or parsnips and harvest them out of the row when they mature and leave the space for the later crop to fill in. If you plant a few in your root crops you will want to harvest them early sometimes you can interrupt the roots of the upcoming crop.
Summer radishes can be sown anywhere from early spring to late spring. These varieties to better in the summer heat, but still like to have it on the cooler side.
Winter/fall varieties of radishes should be planted in the early fall. In the United States anytime from mid-August through Septemb壯陽藥 er. You can plant them in succession to have a consistent fresh crop.
We have used a manual seed planter to plant radish seeds and done well. You simply select the correct size planting disk, put the seed in the hopper on the top of the planter, set the depth on the foot of the planter and push it down the row. This is a good option if you have a larger garden area to plant. Here is one on Amazon that works great.
We also have found that just opening up a row and placing the seeds by hand then closing up the row burying the seeds works great.
Watering
When watering the radishes, you will need to monitor them. Radishes will need consistent moist soil, but not too wet. Radishes can have problems if you let them dry out, so keep them moist. With the cooler temperatures this isn’t a tough thing to do.
Usually watering them once or twice a week when it is cool works fine. You may want to increase watering when the temperature warms up. This will also depend on the composition of your soil, whether it is sandy or clay.
The radishes can get super spicy hot and pithy if they aren’t properly watered. Radishes that are dry will also bolt into seed flowers quicker.
Fertilizing
Usually a light application of a general garden mix fertilizer will be plenty for radishes. Here is an article we wrote about fertilizers that can help clarify.
Radishes are a root vegetable and do not need much nitrogen. Radishes use more potash as far as fertilizer goes. They grow so fast that just using a good general garden mix will be fine. Like a good 16-16-16 garden mix.
Harvesting.
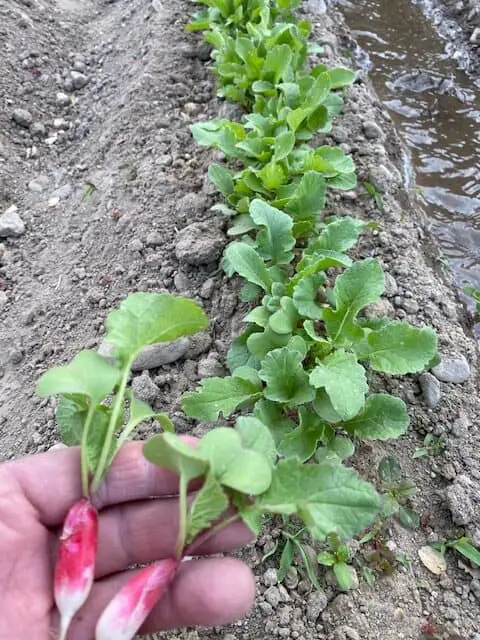
Harvesting radishes is rather simple. You can loosen the soil around the radish with a garden trowel or shovel. You just need to grab the leaves on the top and pull them out. Sometimes wetting the soil can help if the radishes get stuck. The radishes grow so fast and swell up creating compact soil around themselves. Don’t be surprised if they seem to grip the ground a little more than you would expect.
You will want to pick the spring radishes around 3-4 weeks after planting. If you wait too long the radishes will turn fibrous, pithy, and woody. Sometimes the radishes will bolt creating seed pods and the root won’t be very good for table fair. Old radishes have a tendency to become pithy, sort of like eating a cork. So, harvest them on time.
If you have some radishes that bolt, you will want to try to harvest the pods they produce. The pods are often eaten in salads and stir-fries. The rat tail radish is grown exclusively for the seed pods.
With summer radishes you will need to judge them by size. The summer varieties will take a little longer than 3-4 weeks to grow to maturity. The time is takes for summer radishes to mature really depends on the temperature and moisture they are grown at. You will just need to keep an eye on them and pick them when they look mature.
Winter/fall radishes can be left in the ground throughout the winter if needed. Harvesting winter/fall radishes just depends on when you want to eat them or when you need them out of your garden plot.
Problems and issues with growing radishes.
Radishes usually don’t have many issues. Keep them weed free and watered and generally your good to go. There are some issues that you will need to look out for to insure a good crop.
Radish leaves and foliage can sometimes attract cabbage worms. We have a good article on how to deal with cabbage worms here.
Radishes can attract root maggots as well. This can happen more likely if you plant radishes in the same soil year after year. An old trick used by farmers for years is tobacco. Tobacco will keep root worms away from your root crops. Just sprinkle a little tobacco along with the radish seeds and the worms will stay away.
Flea beetles and aphids are also attracted to radishes. Avoid the flea beetle and aphids by planting radishes in a different location from year to year. Keep the radishes weed free. Row covers are an effective deterrent as well. We have a great article here on alternatives to pesticides that can help as well.
Slow growth and an intense flavor. The major cause of this is not enough water. Without enough water the radishes can become downright eye wateringly hot. The best remedy is to keep the soil moist.
Sometimes the radishes can get split or hollow roots as well as a pithy center. They are like eating a piece of cork with a rope down the middle. They way to remedy this is to harvest the roots as soon as possible and keep the soil moist.
Sometimes the radishes will bolt to flowering or seed. The trigger for radishes to do this is when the days get long and the nights are short. The way to remedy this is to plant earlier in the spring or later in the fall. The exception is summer radish varieties.
Preserving and Storing Radishes
Radishes are one of the first, if not the first thing to be harvested from the garden and should be eaten fresh. You can keep spring radishes in the refrigerator for a few weeks and they will be fine. They are a fun treat after those long winter months.
If you do want to store radishes there are a few methods that you can use. You can pickle them, freeze them, dry them, and freeze dry them.
Pickling radishes
Pickling radishes is fairly easy. There are about a million different recipes for pickling radishes. They generally involve vinegar, salt, sugar, hot water, and spices. We will post our favorite radish pickling recipes on our recipe page. For now, here is our simple easy recipe:
What you will need is:
20-25 radishes
1 cup apple cider, or white vinegar (5% acidity)
1/2 cup white sugar
1/2 cup water
4 teaspoons pickling salt, or kosher salt
1 teaspoon yellow mustard seeds
1 teaspoon whole coriander seeds
2 teaspoons whole black peppercorns
2 garlic cloves, peeled, sliced thinly
Prepare the jars by covering in water and boiling for 10 minutes. This will kill any germs or bacteria and sterilize them.
Wash radishes well, scrubbing gently. You will want to do a thorough job with this. Sometimes the pickles can taste like dirt if you don’t clean the radishes well. Cut off the tops and root end. Slice the radishes in thin slices or small chunks.
In a pan add the vinegar, sugar, water and salt. Stir the mixture and bring it to a boil. You need to make sure the sugar and salt are dissolved. You can use whatever vinegar you would like, as long as it has 5% acidity. The acidity helps with the preservation.
Use new canning lids and prepare the lids as you do all canning lids. Put the lids in hot water for a few minutes to heat them up. It’s generally a good idea to put the lids in the water while you are filling up the jars with radishes and pickling juice.
Put the radish slices or chunks into the hot jars. You will need to leave a 1/2 inch of headspace at the top of the jar. Now add the garlic slices and spices. Fill jars with hot pickling juice to 1/2-inch headspace at the top of the jar. Remove bubbles, re-check to see if there is ½ inch spacing at the top of the jar. Wipe the rims with a towel or cloth, put on the lid and screw on the seal ring.
Place each filled jar into the boiling water canner. Jars should be covered by 1-2 inches of water above the lids. Put the lid onto the canner and turn onto high heat. Once the water is back at a full boil, start your timer for 15 minutes (for half-pints and pints). Once the time is up, turn the heat off then remove the lid and wait another 5 minutes before removing the jars.
Let the jars cool overnight out of the canner. Do not tighten the lids of move the jars around. Just let them alone and cool down.
After cooling down check the jars. Look to see if all have sealed. Those that haven’t sealed you will need to refrigerate and eat soon. Those that have sealed can be stored on the shelf for future use. Store them in a cool, dry, dark place. Too much light will blanch out the color of the radishes.
Its best to let the radishes sit in the pickling juice for 4-6 weeks before eating. That way the flavor gets absorbed in the radishes.
Freezing radishes
Freezing radishes is simple and straightforward. The process is blanching the radishes, cooling them down quickly, putting them into containers, and then freezing them. If you don’t do it correctly you can ruin the texture and flavor.
Cut off the tops and roots of the radishes and wash them thoroughly. Slice them thinly or cut them into small chunks. Blanch them in vigorously boiling water.
You need to be aware of the elevation you are living at for how long to blanch radishes. 2 minutes below 5,000 feet, and 3 minutes at 5,000 feet and above.
Cool the radishes in ice water immediately after the time is up for blanching. The cooling process should take about the same amount of time as the blanching process. Drain them once cool.
You can then put them onto containers and put them onto the freezer. One thing you need to be cautious about. If the radishes are left to freeze in a thick bunch or pile, they run the risk of getting spoiled or turning sour. The best method we have found is to put a cup or two of radishes into a gallon freezer bag and spread the bag of radishes flat in the freezer. This allows the radishes to freeze quickly and uniformly.
Drying radishes
Drying radishes is very simple and straight forward. Clean them up, cut them thin and put them in a dehydrator. You can use an oven, but a dehydrator is more efficient.
Cut the tops and roots off the radish and slice them thinly. Place the radish slices on the dehydrator tray and dry them at 125 degrees for 2-6 hours depending on how thin you sliced them.
A trick for slicing them thin is to use a mandolin. It’s easy to use and you can get one on Amazon right here. You can slice them with a knife just fine. A mandolin just makes it a little easier.
After the radishes are dried, they can be stored in a container with stay fresh packets, moisture-vapor-proof containers or bags.
Freeze Drying
Freeze drying radishes has not been readily available for the home user. There is an option available for the home use now and can be used readily for most all vegetables and fruits including radishes.
Freeze drying radishes is very simple. You cut off the tops and roots of the radishes and wash them. Dry them out on a towel or cloth. Put the radishes in the freeze dryer and let the freeze dryer go through its process. The freeze dryer can take anywhere from 30-40 hours to work depending on the moisture and size of the radishes themselves.
Freeze drying tastes great and keeps the nutrients in the process. Freeze drying will keep the food edible and nutrition rich for 25 years. The machine itself is a bit expensive. If you are planning to store a lot of your produce, then you will want to consider a freeze dryer.
You can look at a freeze dryer here. They are a sponsor of our website.
If you are working on a more frugal budget, then you might want to consider other methods of preserving your radishes. However, you can use a freeze dryer for almost any food, including leftovers, and most of your garden produce.
What about radish tops?
Radish tops are edible. The radish greens are rather tough, so if you want to eat them in a salad you will want to eat younger more tender leaves. The mature leaves can be cooked like any other green, from boiling to steaming to sautéing. Radish tops add a spicy flavor to whatever they are added to. You can also mash and blend them into soups, sauces, dips, and pesto.
Give radish tops a try. You will want to make sure they are cleaned well. It’s amazing how small pieces of dirt can hide in leaves.
Radish pods
Radish pods are the seed pods that the radish plant produces after it goes to seed and flowers. Many will just give up and till the pretty little plant under, but the radish seed pods are something to try.
The pods will form once the radish plant has flowered. The pods look like little green pea pods. Pick them when they are young and tender. You can use them like you would radishes. They have a similar flavor.
With these radish seed pods you can pickle them, use them in salads, stir-fry, etc. Radish seed pods are something fun to use even when you think the plant is done.
Radish Recipes
Radish recipes are vast and varied. They are often found on most salad bars and in most green salads served. The humble radish has a lot more going for it than just for a green salad alone.
Salads
You can try radishes in almost any vegetable salad that you would like to add a spicy kick to. Raw fresh radishes straight from the garden or farmers market add a crisp spicy flavor and texture that can sparkle in a green salad. They are also a fun addition, diced or shredded, to three bean salad. When shredded they can add a nice spice to carrot salad. If you are daring add some to your coleslaw.
Fish
I often use diced radish to tuna fish for a welcome crunch to a sandwich or salad. Just prepare the tuna fish the same as you normally would and add diced radish to your taste. I like a lot of the fresh radishes right out of the garden. There is nothing better than eating your own first fruits of the garden.
When grilling fish, I like to put some slices of fresh radish on top of the fish for the last few minutes of cooking. Just so the radishes begin to soften. This works well for salmon, trout, tilapia, and most ocean fish. I have not tried it with walleye, bass, or burbot, but I think it would be worth a try.
A nice tartar sauce can be with radishes. Choose what the base of your sauce you would prefer. I have use mayonnaise, sour cream, plain Greek yogurt, and butter milk. My preference is mayonnaise or Greek yogurt. I usually do not use measurements, I just put in what I think would work and adjust to my taste.
Begin with about a cup of the base you are choosing. Add shredded or diced radishes. The amount depends on your taste. I like a lot, so I use about 1/2 to 1 cup of radishes. I then add about a ½-1 tablespoon of honey or sugar. I will then add a dash, or ¼ teaspoon of lemon or apple cider vinegar. Then mix it well. Give it a taste and add a little more this or that to your liking. A variation that I can sometimes use is some fresh dill from the garden. It’s not often we get dill and radishes growing at the same time, but in that rare case it can be a treat.
Garnish
Radishes are often added as a garnish for many foods. Sometimes relegated as a decorative rose or carved artistic creation. They are stunning with their brilliant white flesh and colorful skins. They can range from bright red to purple to white skins as well. The colors add a decorative look that will give a bland looking meal the punch it needs to look good.
Tacos and Mexican food
Radishes are often found on street tacos or at Mexican restaurants as added garnish. The radishes ad a fresh crisp snap to a taco. They are also a milder selection of the hot peppers are a bit too hot and not to your liking.
Grilled
Radishes are great grilled. They will often be tamed down in the spice when cooked. So if you radishes are just a bit too spicy for you grilling them might be just the ticket for you.
You can put them on skewers with shish kabob. You can put slices on top of all kinds of meat such as steak, pork, chicken, turkey, fish, and hamburgers.
Radishes are also great grilled themselves. Just dip them in butter or vegetable oil and lightly salt them. Grill them until tender and eat. Just remember if you are grilling slices they will take almost no time to cook, so keep an eye on them.
Sautéed
A sautéed radish is amazing. I know many people who have told me they do not care for radishes at all. When they taste a sautéed radish, they change their mind completely. The sautéing takes the spicy taste down a few notches and give the radish a more mellow sweet taste. Similar to a mild turnip or kohlrabi flavor. They have a wonderful earthy root flavor when sautéed.
To sauté radishes just get a frying pan and put butter or your favorite vegetable or olive oil in the bottom. Heat the pan and put in sliced or diced radishes. You can add salt to taste. A great variation is to use bacon and sauté the radishes in the bacon grease.
Refrigerator Pickled Radishes
Refrigerator pickled radishes are a fun treat as well. The refrigerator pickled radishes are a little different than the pickled radishes we talked about previously in the article.
The basic idea is to create a pickle solution and store it in the refrigerator and you can eat them for a few weeks. The recipe we use is pretty simple.
We will use 2 cups of water and a cup of vinegar. You can experiment with the vinegar. We have used apple cider vinegar, white vinegar, and rice vinegar. My preference is apple cider vinegar. You will also need about 2 tablespoons of sugar and about 1 tablespoon of salt. It’s better to use kosher or pickling salt. Iodized salt can change the color of the vegetables more than you want.
Put everything in a pan except for the radishes. Slice the radishes thin or shred them and put them in a bowl. Bring the liquid to a boil and stir dissolving the salt and sugar. Pour the liquid over the radishes and make sure they are covered by the liquid. Let it cool and put it in the fridge to chill. You can keep these pickled radishes for a few weeks.
You can add other vegetables to the pickled radishes, but you will want to keep them in separate bowls when you pour the hot liquid over them. The hot pickle juice can make the color of the vegetables bleed and color everything. So just do the same procedure substituting carrots, or onions, or cucumbers, or cauliflower in different bowls. You can a put them into the same container once cooled down without too much color bleeding.
Roasted Radishes
Roasted radishes are a teat all their own. They take on a sweet rich flavor and a tender texture with a little crisp skin. This is pretty simple. To prepare the radishes you will want to cut the bigger ones in half. Coat the radishes with olive or vegetable oil. Add salt to taste and put them onto a baking sheet. You will want the oven to be pretty hot, about 425-450 degrees Fahrenheit. You will want to keep an eye on them and stir them from time to time to keep them from burning and sticking to the baking sheet. It should take about 15-20 minutes and they will be done.
They remind me of a sweet version of oven fried potatoes. You can add roasted radishes to all kinds of dishes, or just eat them on their own.
Summary
Radishes are a fun first plant of the garden. They grow easy and fast. If you want to have a positive experience with gardening maybe radishes should be on your list.
When you do get them from the garden or farmers market make sure to try them in several different ways. Radishes are fantastic raw on their own and in salads, but you might want to try the several ways to cook them. You might find out that you might be more a of a radish fan than you thought.